The Art of Attack and Counter-Attack
“Attack is the secret of defense; defense is the planning
of an attack.”
― 2024.12.31
2024.12.31
0-1
(White) Magnus Carlsen vs
(Black) Ian Nepomniachtchi
(WhiteElo) 2890
(BlackElo) 2770
Ian Nepomniachtchi wins after 31 moves.
Every chess player, from beginner to grandmaster, has faced that challenging feeling: you're under attack. Your king is exposed, pawns are falling, and your opponent seems to be building an unstoppable offensive. It's natural to want to hunker down, defend every piece, and weather the storm. But what if the best defense isn't defense at all? What if it's a well-timed, expertly executed counter-attack?
Sun Tzu asserts that, "attack is the secret of defense." In chess, this isn't just a catchy phrase; it's a fundamental truth that can turn the tide of a losing position and even secure victory from the jaws of defeat.
Why is Counter-Attacking So Potent?
Shifting the Initiative: When you're being attacked, your opponent holds the initiative. They're dictating the pace and direction of the game. A successful counter-attack seizes that initiative back. Suddenly, your opponent is forced to react to your threats, disrupting their plans and forcing them onto the defensive.
Creating Chaos and Complexity: A well-placed counter-attack introduces new complications into the position. Your opponent, who was comfortably executing their attack, now has to deal with unexpected dangers. This can lead to mistakes, as they may overlook a critical detail or miscalculate a response under pressure.
Exploiting Overextension: Aggressive attacks often involve bringing many pieces forward, sometimes leaving their own king or other vital squares undefended. A sharp counter-attack looks for these weaknesses, targeting exposed pieces or open lines that your opponent neglected in their zeal to attack.
Psychological Impact: There's nothing more demoralizing for an attacking player than to have their efforts thrown back in their face. A strong counter-attack can shatter your opponent's confidence, making them more prone to errors in the remainder of the game. They might become hesitant, afraid to commit to further attacks.
1. e4 e6 2. d4 d5 3. Nc3 Nf6 4. e5
This is known as the Steinitz variation of French Defense. This variation gives White a space advantage in the center. The pawn advance appears to be very threatening. However, as the game proceeds, Black will challenge this pawn advance that would reveal the weakness of the position.
Nfd7 5. Nce2 c5 6. c3 Nc6 7. a3 a5 8.
Nf3 a4 9. h4 Nb6 10. Nf4 Na5 11. Rb1 Bd7 12. Bd3
In this position, White has dominated the Kingside and Black has space advantage on the Queenside. This type of position usually occurs in the French Opening where all of the White's pieces are aimed on Black's Kingside. On the other hand, Black will fight back by concentrating all its pieces on the the Queenside.
h6 13. O-O Qc7 14. Re1
Nbc4 15. Nh5 Bb5 16. dxc5 Qxc5 17. Nd4 Bd7 18. Qg4 O-O-O 19. Qf4 Qe7 20. b3
With this pawn push, White begins the attack. White attempts to complicate the position. The pawn push is risky. However, it is necessary to create some type of counter-play. The beauty of chess can be found in positions where there is a very little room to maneuver. Yet, you try to find that very little chance to get some sort of advantage.
axb3 21. Nxb3 Nxb3 22. Rxb3
The position below shows that White has the advantage. White's pieces have forcibly occupied a wider scope of the battle field. The rook's might on b3 is focused on the pawn at b6. Black's position at this point is dangerous. Black's pieces are undeveloped particularly the Bishop on f8.
Bc6 23. Be3 g5 24. Qd4 gxh4 25. Nf6 Bg7 26.
Reb1 Bxf6 27. exf6 Qc7 28. Qa7 Rhg8 29. Bf4 Qxf4 30. Rxb7
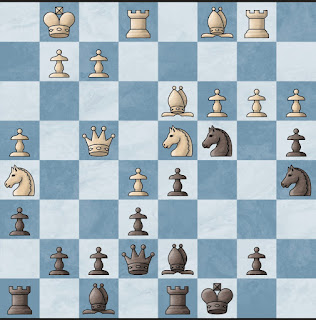
White appears to have a dominant advantage. Black cannot take the Rook on b7 because it is checkmate. From the looks of it, it seems that Black is lost. White has a tremendous attack that cannot be defended. Black' s position appears to be totally lost. White's rook and Queen have all concentrated their forces on the Queenside. This is the type of position where a desperado move is necessary.
Black's hope lies on the open g-file! We can see how Black's rook is aimed at the g2 pawn. The dynamics of the position means that the only best move for Black is to exploit this open file.
Rxg2+ - this move is not surprising. However, it may have shocked White and realized that this move is a winning move! This is what is beautiful about the game of chess. There are times that even if you are in a losing position, there are opportunities that you can exploit to win the game. However, you must be very observant to realize the opportunity.
31. Kxg2 Ne3+ 0-1 - White has no better option but to take the Rook. It is obvious to see that not taking the rook leads to checkmate. But the next move (Ne3+) is not that easy to see. After the move (fxe3), another very important resource comes to life - the Black's Bishop at c6! After a forced sequence of moves lead to White getting checkmated.
This game highlights a crucial chess lesson: attack is often the best defense. When facing an assault, it's vital to identify and precisely execute counter-attacking opportunities. Hesitation or a failure to seize such a chance can lead to defeat.


Comments